How to Teach An Awesome First Class on OutSchool
Welcome back to part two of my OutSchool adventures! There’s a lot of information in this post, which is why I separated it from the post about applying and getting hired. This part can be daunting and don’t worry if it is, it definitely was for me too! I procrastinated hard on creating my first class. That’s why I wanted to show you exactly what I did to take some of the fear out of the unknown!
What Should I Teach on OutSchool?
First of all, OutSchool sends an awesome email EVERY week with HUNDREDS of class requests from parents and students, so you’re not taking a shot in the dark! You can peruse this list and base your class around a request to ensure that people are interested. I think you will be pleasantly surprised by the list of requests. It’s not your basic “fourth grade math” or “Shakespeare reading and discussion”. People want classes on drawing, coding, animals, even Tiktok dances! They also ask for a lot of socialization classes where you can just help the students engage in conversation about different topics. There is truly something for everyone!
If you haven’t gotten hired yet, you can still access the updated list of requests on OutSchool’s website here: https://teach.outschool.com/parent-topic-requests/
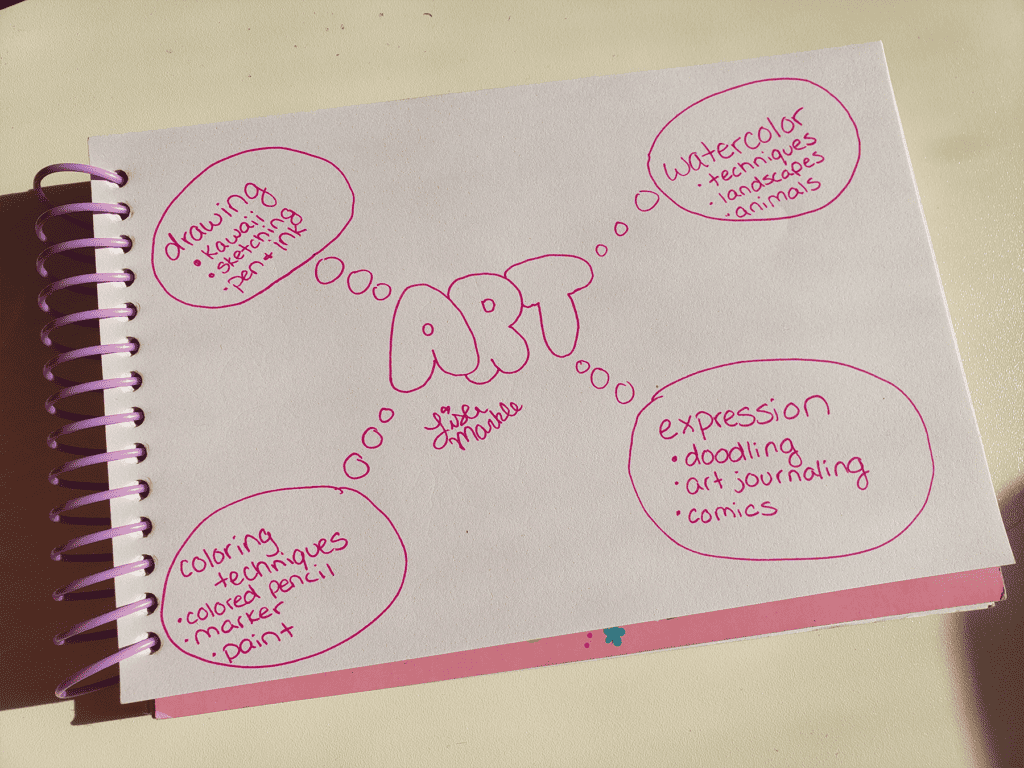
Decide on a big genre that you are skilled in or enjoy and break it down into topics and small pieces. You will be surprised just how fast a 30 or 60 minute class goes, and you can get a lot of class ideas out of one big idea! There are a lot of different ways to structure your classes, so there is no right or wrong here. Treat it like a daily lesson plan on a specific subject, if you have a teaching background. Try doodling a mind map and repeatedly break your ideas down! I will show an example here.
My teacher bestie Lauren also has a YouTube video to help you brainstorm class ideas! Check it out here!
Okay, I Have an Idea for a Class, Now What?
Once you have a pretty clear idea of the class you want to teach, head over to your teacher portal and create the outline for the class. I would do this as soon as possible, because they will then have to approve the class before it can be listed and booked, and this can take several days. Once it’s approved, you can list the class and choose to teach it as many times as you want!
You will need to decide what age range is appropriate for your class, how many students can enroll, the price per student, the time length of the class, materials the students should have during class, then write a simple outline of what will take place in class and learning goals. This felt very similar to writing a very short summary of a lesson plan to me.
Your class will also need a preview image. If you don’t have a lot of graphic design knowledge, you can use a stock photo, whip up an image with Canva, take a photo of yourself posing with the materials of the class, or take a photo of what you’ll actually be teaching, such as a drawing if you’re teaching how to draw something. I would recommend having all your class previews contain some similar element that will help students and parents to recognize you and your “brand” on OutSchool. You can also submit a video about the class, but this is optional.
OH MY GOSH I HAVE TO TEACH MY FIRST CLASS
Don’t panic! You can do this! I can assure you, I felt the same way! Here are some things I did before teaching my first class that helped ease my nerves:
Check out the free training modules on the OutSchool teacher portal. They give you a lot of insight into how teaching will look, and tips on situations that could arise. OutSchool also has a YouTube channel with webinars on a variety of topics that will make you feel ready to use the platform!
Find a teacher friend and have a Zoom session with them! OutSchool uses Zoom as their classroom through the OutSchool website, but it is the same as a regular Zoom meeting. I believe Zoom allows free time-limited use if you don’t have a subscription, so try it out with a friend and play with all the buttons. You won’t feel like you’re walking into class so clueless anymore!
Enter the classroom early so you can make sure everything is set up and working! I gave myself twenty extra minutes before my first class because I had a few extra new-to-me technology situations that I needed to learn. I will explain them in more detail in another post.
Write down your class “plan” and keep it where you can glance at it. Write down a few ideas to do if you end up having extra time so you don’t stress about finishing too fast.
And there you have it! You can do this! I would love it if you shared your own tips on teaching your first class with me in the comments! Or let me know if these tips helped you!
you may also like...
Hello! I’m Lisa!
I’m a digital illustrator! I make fun printable coloring pages and coloring books for busy moms, teachers, and their creative kids!

